
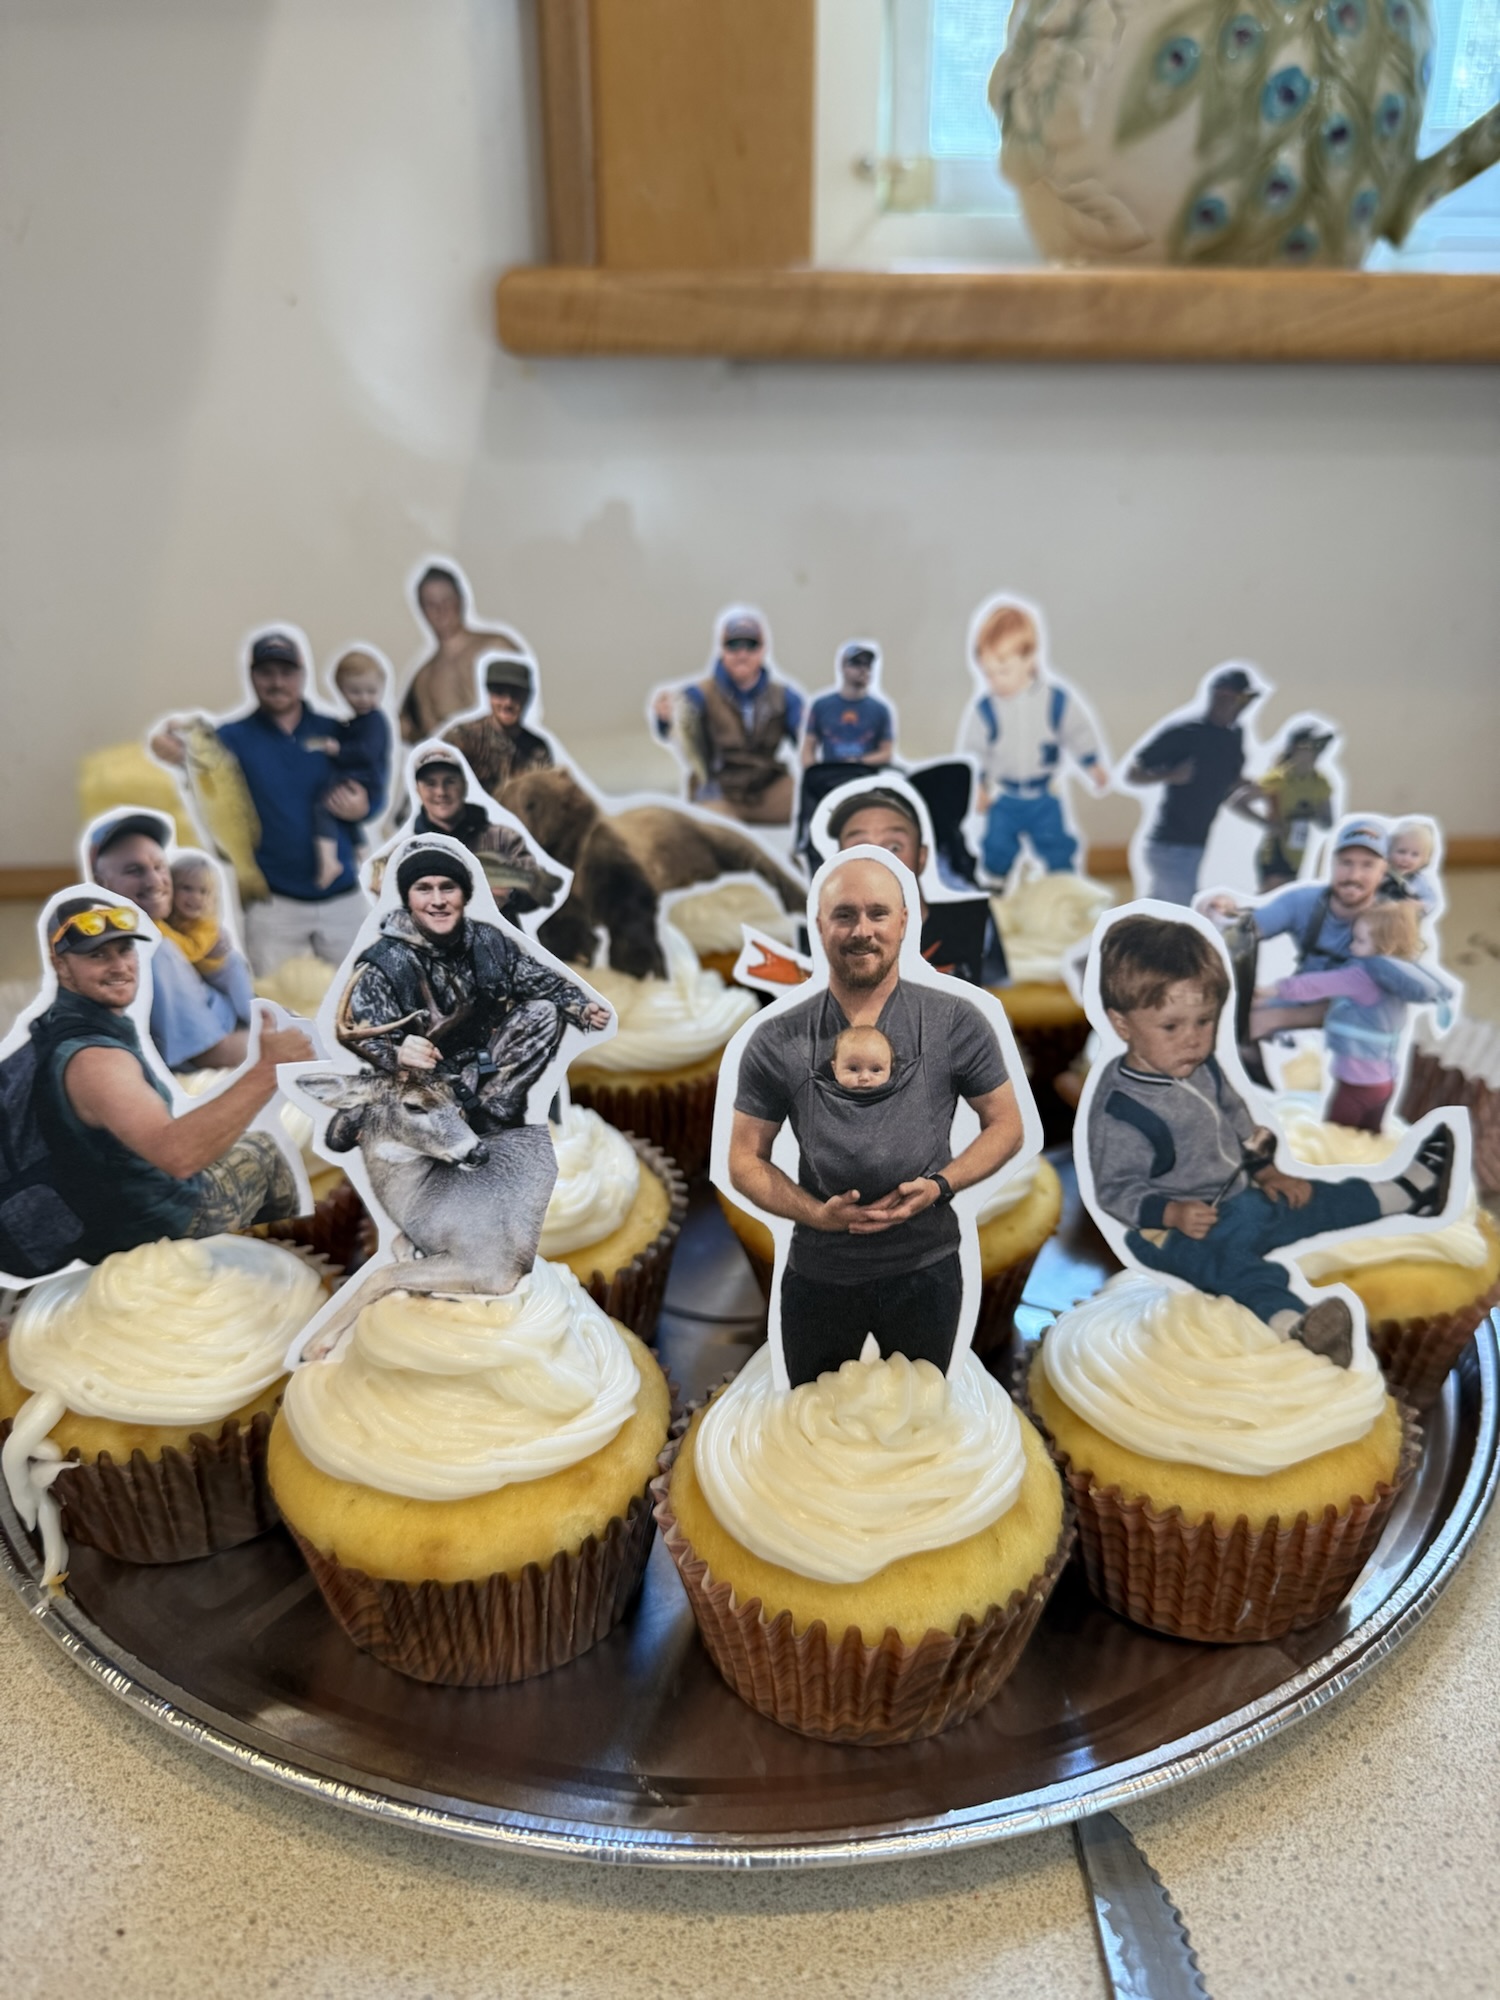
For my husband’s 40th birthday, I wanted to create a party that felt really personal and completely him. We went with a hunting-themed celebration, so there were plenty of rustic, outdoorsy, and hunting-inspired decorations throughout the party. But I also wanted my husband to be the main focal point of his own birthday celebration.
So I came up with a fun idea: personalized cupcake toppers featuring photos of him!


Instead of using generic hunting-themed cupcake decorations, I turned some of my favorite photos of my husband into custom cupcake toppers. They were such a fun addition to the dessert table, and honestly, they were incredibly easy and inexpensive to make.

You don’t need any fancy crafting skills or expensive supplies to make these. With a few basic materials, some photos, and a little bit of time, you can create completely personalized cupcake toppers for birthdays, anniversaries, graduations, baby showers, or any other celebration.


And the best part? You can make them look custom-made without spending much money at all.
Here’s exactly how I made these DIY photo cupcake toppers for my husband’s 40th birthday party.
What You’ll Need
The best part about these DIY photo cupcake toppers is that you only need a few simple and inexpensive supplies to make them.
- Photos – Choose your favorite photos of the birthday person. I used photos of my husband for his 40th birthday.
- Cardstock Paper– I recommend using a heavier-weight white cardstock so the toppers are sturdy.
- Printer – A standard home printer works perfectly for this project.
- Scissors – For cutting out your photos.
- Toothpicks – These will become the cupcake topper sticks.
- Hot Glue Gun – Used to glue the toothpicks onto the back of the photos. A small piece of clear tape also works!
Step 1: Choose and Prepare Your Photos
The first thing you’ll want to do is choose the photos you want to use for your cupcake toppers.
You can simply print your photos as they are and cut around the image, or you can create a fun cutout of the person with a clean white background like I did.
If you have an iPhone, this is incredibly easy!
Open the photo you want to use in your Photos app, then press and hold your finger on the person in the photo. Your iPhone will automatically detect the person and separate them from the background, essentially turning them into a sticker.
A small menu will pop up with options such as Add Sticker and Share. Tap Share, then select Save Image.

After your iPhone detects the person and removes the background, tap Share from the menu that appears. From there, select Save Image. This will save the cutout as a new image in your iPhone photo album, ready to upload into Canva.
Your iPhone will then save the cutout as a new image in your photo album, with the person separated from the original background.
And that’s it! You now have a clean cutout of your person that you can use to create your personalized cupcake toppers—without needing any fancy photo-editing software.
Step 2: Create Your Cupcake Topper Design in Canva
If you’re using the iPhone cutout method from Step 1, the next step is to bring your images into Canva.
Start by creating a new blank Canva design. You can use whatever size works best for your printer and paper, but I recommend keeping the design simple since these will be cut down to cupcake-size toppers.
Upload your cutout image to Canva and add it to your blank document. From there, you can resize the image to the size you want for your cupcakes.

I was able to fit about eight images on one Canva page, which worked really well for my cupcake toppers. You can fit more or fewer depending on how large you want your toppers to be.
Once you have your images arranged on the page, save your Canva design and print it out.
What Paper Should You Use?
For the best results, print your cupcake toppers on either photo paper or cardstock.
I personally recommend cardstock because it gives the toppers a little more structure and makes them easier to handle once you cut them out. Photo paper will also work if you want a brighter, more photo-like finish.
Tip: Before printing an entire sheet, you may want to print one test page first to make sure you’re happy with the size of your images.
Step 3: Cut Out Your Images
Now it’s time to cut out all of your images!
Using a pair of scissors, carefully cut around each person. I recommend leaving a small amount of white space around the edge of the image rather than cutting right up against the person.

I loved the way the little white border looked on my cupcake toppers because it helped the photos stand out and really pop against the cupcakes.

You don’t have to make the cuts perfect—the white border makes the finished toppers look intentional and polished, even if your cutting isn’t absolutely perfect.
Once you’ve cut out all of your images, you’re ready for the next step!
Step 4: Attach the Toothpicks
Once all of your images are cut out, lay them face down on a clean surface so you don’t get any dirt or debris on the front of your toppers.
Next, heat up your hot glue gun and place a small dab of hot glue on the back of each image. You really don’t need much—a dab about the size of a pencil eraser is plenty!

Place the glue toward the lower portion of the image, but not too close to the bottom edge. You want the toothpick to have enough room to sit securely while still leaving plenty of the toothpick exposed to stick into the cupcake.
Lay a toothpick directly into the hot glue, positioning it so that roughly half of the toothpick extends below the image. This gives you enough length to insert the topper into the cupcake while keeping the photo sitting nicely above the frosting.

Let the glue cool and harden completely before moving on to the final step.
Step 5: Add Your Cupcake Toppers!
And that’s it—you now have your awesome DIY photo cupcake topper! 🎉
Once the hot glue has completely cooled, your personalized topper is ready to add to your cupcakes. Simply insert the exposed end of the toothpick into the cupcake and you’re done!
Want to Make a Larger Topper?
This same method works perfectly if you want to create a larger photo topper for a birthday cake.
For my husband’s 40th birthday, I made the cupcake toppers smaller and attached them to toothpicks, but I also created a larger version for his birthday cake. For the larger topper, I simply used a popsicle stick instead of a toothpick.
Just size your image up in Canva, print it on cardstock, cut it out, and attach it to a popsicle stick with hot glue.
It’s the exact same process—just bigger! And it makes such a fun statement on the cake.
More Ways to Customize a Party
I love finding simple ways to make a party feel personal and unique to the person you’re celebrating.
I used a similar photo-cutout idea for my daughter Maddie’s Gabby’s Dollhouse birthday party, where I turned photos of Maddie into little cutouts and placed them throughout her dollhouse. It was such a fun and easy way to make the decorations feel extra special!


The possibilities are endless—you can use photo cutouts on cakes, dessert tables, centerpieces, or even around your party space.
Check out Maddie’s Gabby’s Dollhouse Birthday Party to see how I used this same idea in a completely different way.
Final Thoughts
There’s something really special about adding personalized, handmade details to a party. Anyone can order decorations online, but taking the time to create something specifically for the person you’re celebrating makes the party feel so much more meaningful.
These photo cupcake toppers are such a simple DIY, but they made a big impact at my husband’s 40th birthday party. They helped make him the focus of the celebration and added a personal detail that our guests loved.

The key is to start early! If you give yourself a few weeks before the party to work on little DIY projects like this, you won’t feel rushed, and you’ll have plenty of time to create those extra-special details that make a celebration truly memorable.
Sometimes it’s those little personalized touches that take a party from ordinary to unforgettable.
Want to see the whole party? Check out My Husband’s Hunting-Themed 40th Birthday Party to see how all of the personalized details came together!

Leave a Reply