
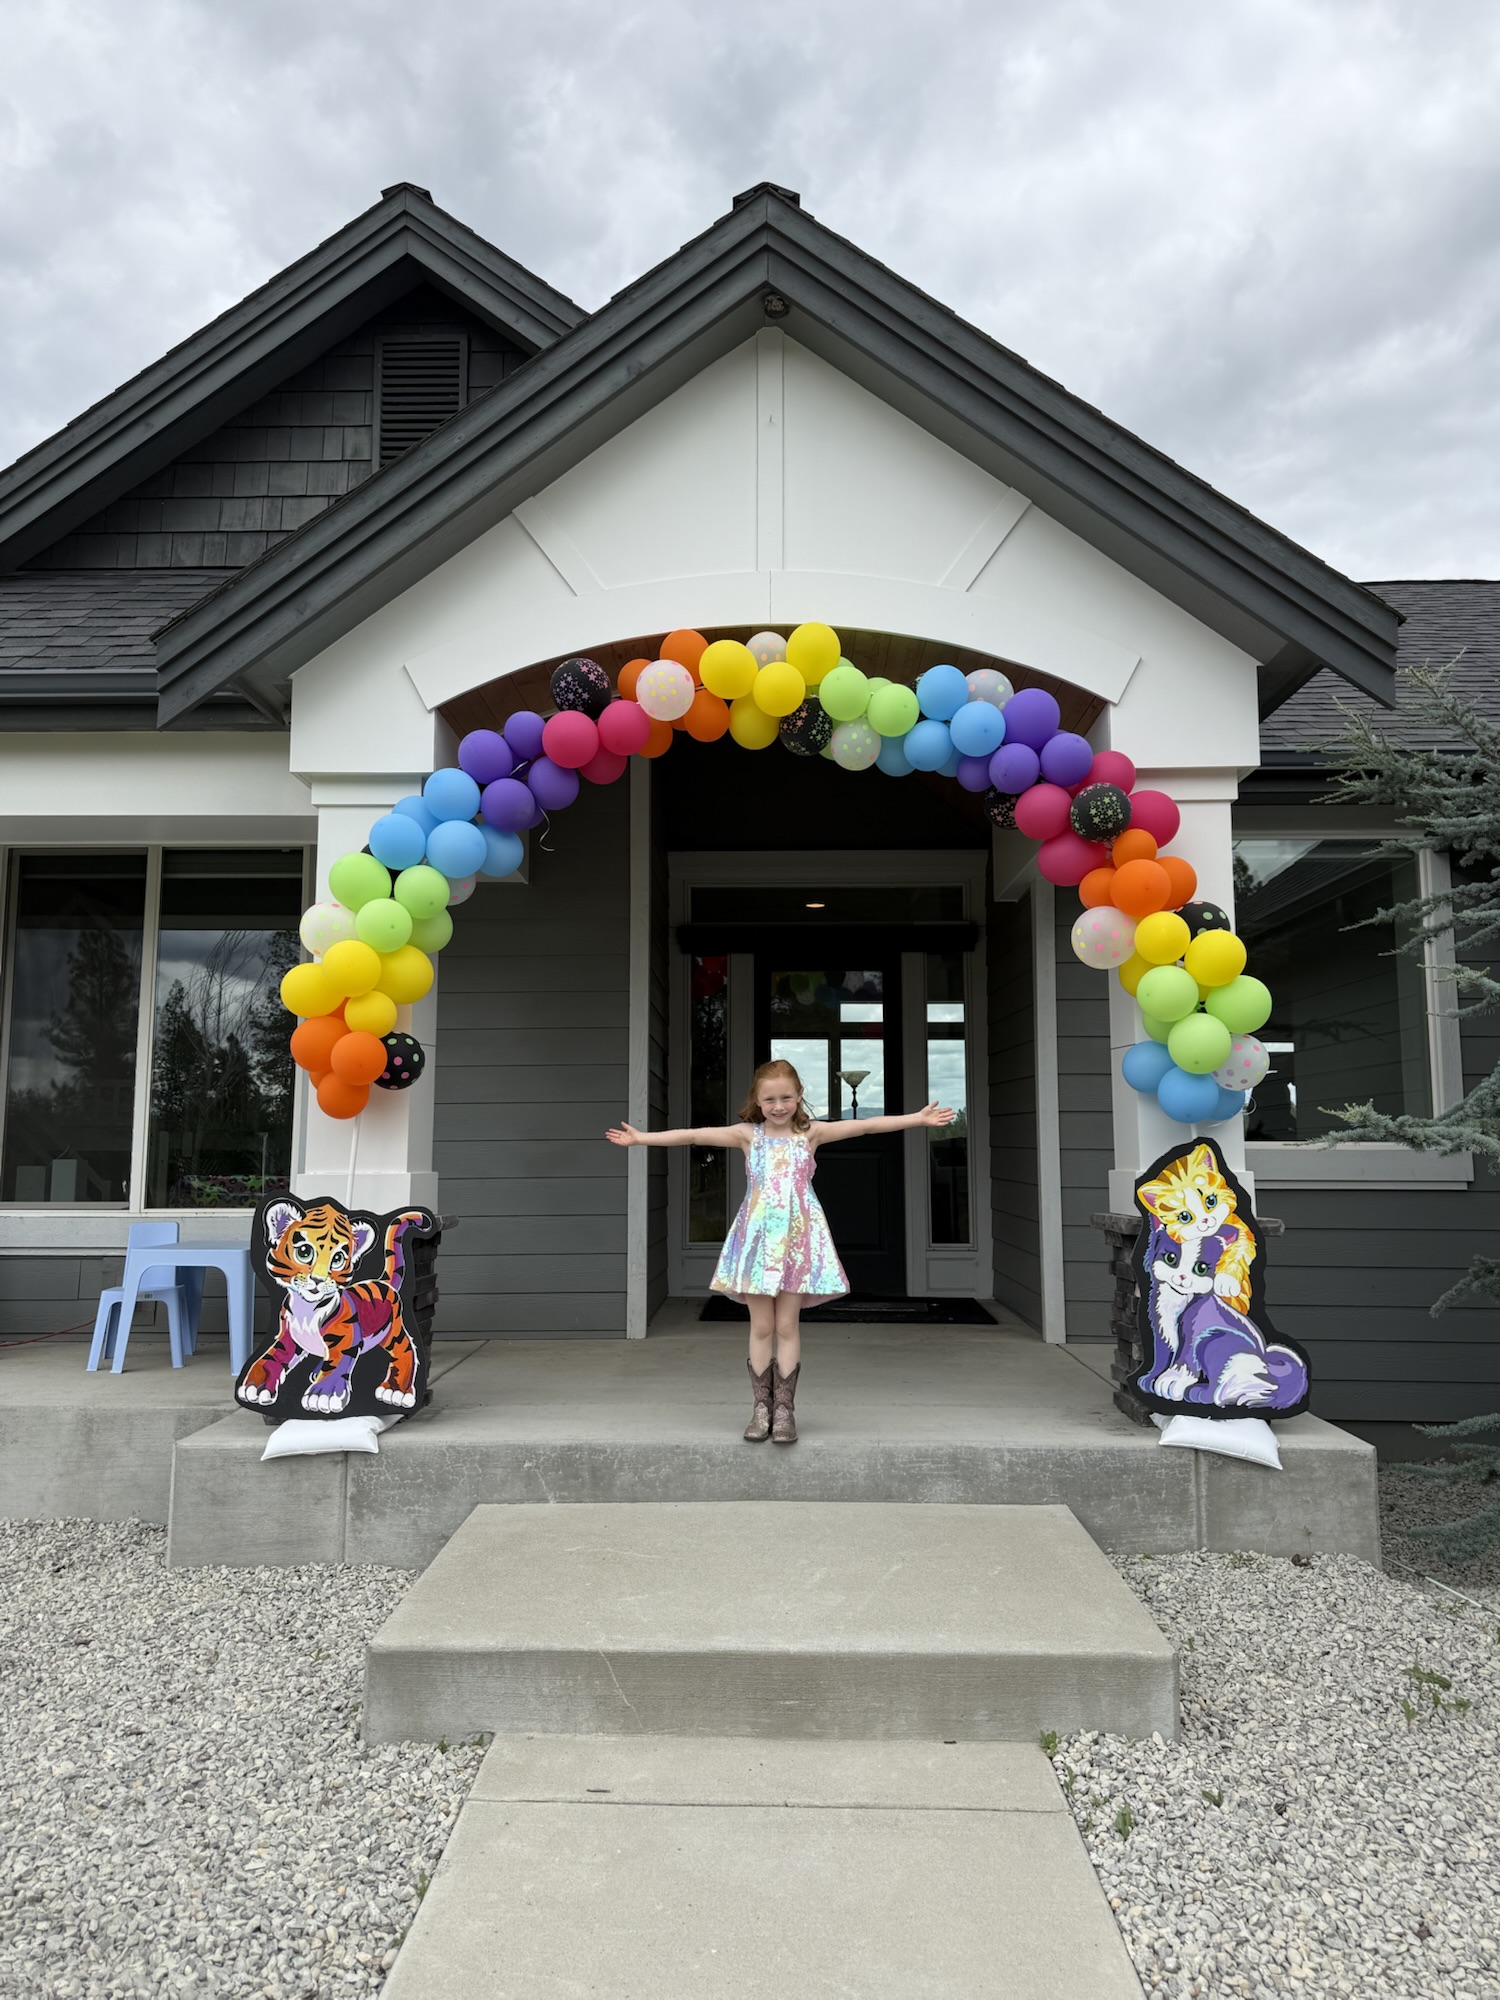
Balloon arches are one of my favorite ways to instantly transform a party and create an immersive atmosphere that guests will remember. While they may look complicated, they’re actually much easier to make than most people realize. I taught myself how to make balloon arches through trial and error, and now they’ve become one of my favorite party decorations. In this tutorial, I’ll show you exactly how I make them so you can create one for your next celebration too.
Affiliate Disclosure: This post may contain affiliate links, which means I may earn a small commission if you make a purchase through my links at no additional cost to you. I only recommend products I personally use and love. Thank you for supporting Mom Life with Kelsey!
Supplies You’ll Need
The nice thing about balloon arch kits is that they usually come with almost everything you need to get started. Most kits include the balloons, a balloon decorating strip, and glue dots to help fill in any empty spaces.
Here are the additional supplies I always recommend having on hand:
- Electric balloon pump – This is my #1 recommendation! It will save you so much time and effort, especially if you’re inflating 100+ balloons.
- Balloon arch kit – Choose a kit that matches your party colors or theme.
- Push pins or Command hooks – I use these to hang my balloon arches, depending on the surface.
- Thin white ribbon or fishing line – Many balloon kits include thin white ribbon, which works perfectly for hanging and securing the balloon arch.
- Scissors – Helpful for trimming ribbon or fishing line.
Kelsey’s Tip 💛
Most balloon arch kits already include the decorating strip and glue dots, so don’t be surprised if you open the package and realize you already have everything you need. The one item I wouldn’t skip is an electric balloon pump—it’s easily the biggest time-saver when building a balloon arch.
My Favorite Balloon Arch Supplies
- Electric Balloon Pump ⭐ (Most Recommended)
- Balloon Arch Kit
- Command Hooks
- Balloon Glue Dots (if someone needs extras)
- Balloon Arch stand (optional)
Before You Get Started
One of the best things about balloon arches is that you don’t have to make them on the day of your party. I usually start mine up to one week before the celebration, which makes party day much less stressful.
I’ll inflate all of the balloons, assemble the balloon arch on the decorating strip, and then store it somewhere safe until I’m ready to hang it. On the day of the party, I simply hang the balloon arch, add the small filler balloons with glue dots, and make any final adjustments. This lets me focus on the rest of my party setup instead of rushing to build the balloon arch at the last minute.
💛 Kelsey’s Tip: Store your balloon arch in a safe place away from kids and pets until party day. Trust me—it’s much easier to keep little hands and curious pets away than it is to rebuild a balloon arch the morning of your party!
Step 1: Organize and Inflate Your Balloons
I like to start by opening my balloon arch kit and sorting the balloons by color. While this step isn’t required, I find it makes assembling the balloon arch much easier later on.

Next, I begin inflating the balloons with my electric balloon pump. Most balloon arch kits include several balloon sizes, so I like to inflate all of the largest balloons first before moving on to the medium and smaller sizes.
When it comes to the smallest balloons, I usually don’t inflate all of them right away. Instead, I blow up just a handful and save the rest. The tiny balloons are perfect for filling in gaps once the balloon arch is assembled, and I rarely end up using every single one.
💛 Kelsey’s Tip: Don’t worry about making every balloon exactly the same size. Slightly different sizes create more dimension and give your balloon arch a fuller, more professional look.
Step 2: Assemble Your Balloon Arch
Once you’ve inflated all of your balloons, it’s time to start assembling the balloon arch.
Most balloon arch kits come with a clear plastic decorating strip that has a series of evenly spaced holes along the entire length. To attach your balloons, simply take the tied end (the balloon knot) and push it through one of the holes in the strip. The strip will hold the balloon securely in place, and you’ll continue repeating this process until your balloon arch starts to take shape.

There isn’t one “right” way to arrange the colors, so have fun with it! You can alternate colors for a patterned look, create an ombré effect, or cluster similar colors together. I usually group about 5–7 balloons of the same color before switching to the next color because I love the more organic, professionally styled look it creates.
💛 Kelsey’s Tip: When assembling your balloon arch, use only the large and medium-sized balloons on the decorating strip. Save the smallest balloons for the very end. Once your balloon arch is hanging, you’ll use those tiny balloons with glue dots to fill in any gaps and give your arch a fuller, more professional look.
Before Moving on to Step 3…
At this point, my balloon arch is at a great stopping point. I carefully store it in a cool, dry, safe place until I’m ready to hang it. The rest of the decorating happens once the balloon arch is up and hanging.

I usually hang my balloon arches the night before the party so my kids wake up to a completely transformed house on the morning of their birthday. It makes the day feel extra special for them! Decorating the night before also helps me check one more thing off my to-do list, so I’m not scrambling on party day. Plus, hanging it the night before means it’s not sitting out any longer than necessary, reducing the chances of it getting bumped, popped, or damaged before the celebration.
💛 Kelsey’s Tip: Don’t forget to capture the moment! I love recording my kids as they walk out of their bedrooms and see the house transformed for the first time. Their reactions are some of my favorite birthday memories.
Step 3: Hang Your Balloon Arch
Now it’s time to hang your balloon arch!
The best way to hang your balloon arch depends on where you’ll be displaying it. Since balloon arches are lightweight, there are several easy ways to secure them.
Hanging on a Wall
If I’m hanging a balloon arch on a wall, I usually use push pins. I simply tie thin white ribbon around several spots on the balloon arch (making sure it wraps around the decorating strip so it’s secure), then loop the ribbon around the push pins. The balloons hide the ribbon and push pins, making them almost invisible once everything is in place.
Hanging on Vinyl, Brick, or Other Smooth Surfaces
For surfaces where push pins won’t work, I recommend using Command hooks or adhesive hooks. Attach the hooks first, then tie or loop the ribbon onto the hooks to hold the balloon arch in place.
💛 Kelsey’s Tip: Be sure to follow the directions when using adhesive hooks. Some paints and wall finishes can be damaged when removing them, so always test them on an inconspicuous area first if you’re unsure.
Hanging on a Staircase
A staircase is one of the easiest places to hang a balloon arch! Simply tie the ribbon around the stair railing and adjust the balloons until you’re happy with the shape.
Using a Balloon Arch Stand
If you’d like guests to walk underneath your balloon arch or want a freestanding display, consider using a balloon arch stand. I recently used one for my daughter’s Lisa Frank birthday party, and it made creating a beautiful walk-through balloon arch incredibly easy.

Step 4: Fill in the Gaps
Once your balloon arch is hanging, it’s time for my favorite part—making it look full and professionally styled!
Take some of your smallest balloons and place 1–3 glue dots near the tied end (the balloon knot). I usually use three glue dots to make sure each balloon stays securely in place. Remove the clear backing from the glue dots, then press the balloon onto your balloon arch anywhere you notice a gap. The small balloons help hide the decorating strip and fill in empty spaces, giving your balloon arch a much fuller, more polished look.
Don’t overthink where to place them. I like to step back every few minutes, look for any areas that seem sparse, and then add a few more small balloons where they’re needed. I usually end up using about half of the small balloons that come in my balloon arch kits, but every design is a little different.
💛 Kelsey’s Tip: Work slowly and step back often to look at your balloon arch from a distance. It’s much easier to spot empty spaces from across the room than when you’re standing right next to it.
Fun Ways to Dress Up Your Balloon Arch
One of my favorite things about balloon arches is how easy they are to customize. With just a few simple additions, you can completely transform your balloon arch to match your party theme and create an even more immersive party atmosphere. Here are a few of my favorite ways to elevate a basic balloon arch.
🎀 Add Decorative Ribbon
One of my favorite ways to dress up a balloon arch is by adding decorative ribbon bows. For my daughter’s Wicked birthday party, I ordered a ribbon kit that came with bows in a variety of shades of pink and sizes, along with small double-sided adhesive stickers.
After my balloon arch was completely finished, I simply attached the adhesive stickers to the back of each ribbon and pressed them directly onto the balloons. It only took a few minutes, but it completely transformed the balloon arch! The different shades of pink and layered ribbon bows added so much texture and whimsy, making the entire display feel even more magical.

💛 Kelsey’s Tip: Before buying new decorations, look around your house for items you already own that match your party theme. For my daughter’s Wicked Birthday Party, I used the blush pink chair from her bedroom as part of the display. It matched the decorations perfectly, and we even had her sit there while everyone sang “Happy Birthday.” It became one of my favorite moments from the party!
🌸 Add Fresh Baby’s Breath
Balloon arches aren’t just for kids’ birthday parties! For my mother-in-law Dorothy’s 70th Birthday Celebration, I wanted the decorations to feel a little more elegant. I tucked fresh baby’s breath throughout the balloon arch, and it completely transformed the look.
The baby’s breath tied in beautifully with the floral centerpieces and other decorations, giving the balloon arch a softer, more sophisticated feel. It’s a simple addition that makes a big impact and is perfect for adult birthdays, bridal showers, weddings, baby showers, or any celebration where you’re looking for a more elevated look.

🎭 Add Themed Props
For kids’ birthday parties, adding themed props around the base of your balloon arch is always a huge hit! I’ve used Care Bears cardboard cutouts and even hand-painted Lisa Frank foam board animals to bring the party theme to life. These extra details create an immersive display and make the perfect backdrop for photos with family and friends.

💛 Kelsey’s Tip: Place your themed props near the base of the balloon arch to frame the display and create a fun, interactive photo spot for guests.

Balloon Arch Inspiration
Looking for more balloon arch ideas? Here are a few of my favorite balloon arches I’ve created over the years. Each one has its own unique style and color palette. Click on any of the parties below to see the full decorations, DIY projects, party planning tips, and tutorials!
🌈 Lisa Frank Birthday Party
Bright rainbow balloons paired with hand-painted Lisa Frank decorations created one of my favorite party entrances.

→ Read my Lisa Frank Birthday Party
🤠 Toy Story Birthday Party
A colorful balloon arch inspired by Woody, Buzz Lightyear, and friends helped bring this classic movie theme to life.

→ Read my Toy Story Birthday Party
🏠 Gabby’s Dollhouse Birthday Party
Bright pastel balloons created the perfect backdrop for this fun and playful Gabby’s Dollhouse celebration.

→ Read my Gabby’s Dollhouse Birthday Party
🦆 One Lucky Duck Birthday Party
Soft neutral greens, browns, and yellows made this balloon arch the perfect finishing touch for my son’s “One Lucky Duck” first birthday.

→ Read my One Lucky Duck Birthday Party
🧸 Care Bears Birthday Party
A pastel rainbow balloon arch paired with Care Bears cutouts created a cheerful entrance that guests loved.

→ Read my Care Bears Birthday Party
🎉 Want to Make Party Planning Even Easier?
After planning countless birthday parties over the years, I created the exact 16-page party planning system I use for every celebration. If you’d like a little extra help staying organized and avoiding the last-minute scramble, this printable planner is designed to keep everything in one place from start to finish.
Inside you’ll find:
- 🎈 Party planning timeline
- ✅ Party planning checklists
- 🛒 Shopping list
- 💰 Budget tracker
- 🎁 Gift tracker for thank-you notes
- 👧 Kids’ guest list
- 🧑 Adult guest list
- 🧼 Party cleaning checklist
- 💡 Helpful party planning tips throughout
- ✨ And much more!
This is the exact planning system I use behind the scenes for the birthday parties you see here on my blog. It’s helped me stay organized while planning everything from simple family celebrations to large themed birthday parties, and I hope it helps make your next celebration feel less stressful too.

🎉 Grab my 16-Page Party Planner on Etsy for just $4.99!
Final Thoughts
I hope this tutorial has shown you that creating a beautiful balloon arch is much easier than it looks! The first one may take a little extra time, but with each party you’ll get faster and more confident. After making balloon arches for so many of our family celebrations, I can usually put one together in about 30 minutes to an hour.
Learning to make your own balloon arches is one of my favorite ways to create an immersive party atmosphere while saving hundreds of dollars on professional decorations. It’s an easy DIY project that makes a huge impact and can be customized for almost any birthday party or special celebration.
If you make a balloon arch using this tutorial, I’d love to see it! Tag me on Instagram @momlifewithkelsey_ so I can cheer you on and see your beautiful creations.
Happy party planning! 🎈
Leave a Reply