

If you’re planning a Gabby’s Dollhouse birthday party, these DIY decorations are the easiest way to create a colorful, fun setup without spending a ton of money. For my daughter’s party, I focused on a few simple projects that made a big impact—from balloon garlands to a giant dollhouse backdrop—and I’m breaking each one down step-by-step so you can recreate the same look at home.
This post may contain affiliate links. If you purchase through my links, I may earn a small commission at no extra cost to you. I only share products I personally used and loved for this party. As an Amazon Associate, I earn from qualifying purchases.
Here are all the decorations I used for Maddie’s Gabby’s Dollhouse party! I linked everything in one place—including both ready-to-use decor and some of the supplies I used for the DIY projects below.
DIY Gabby’s Dollhouse Balloon Garland
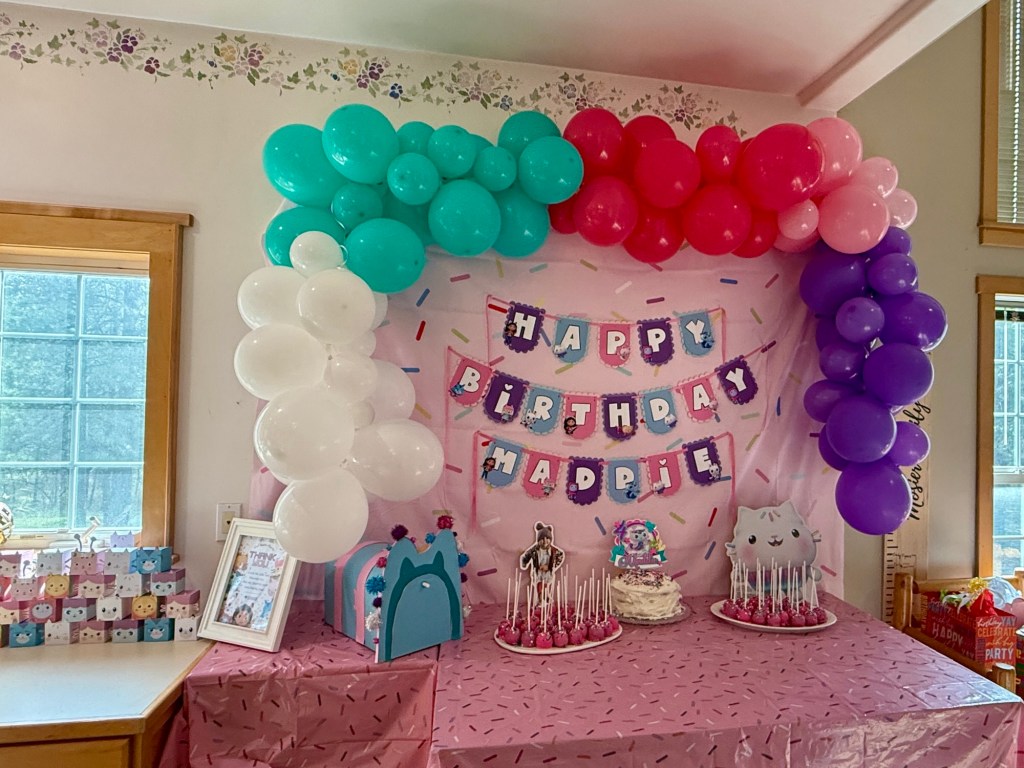
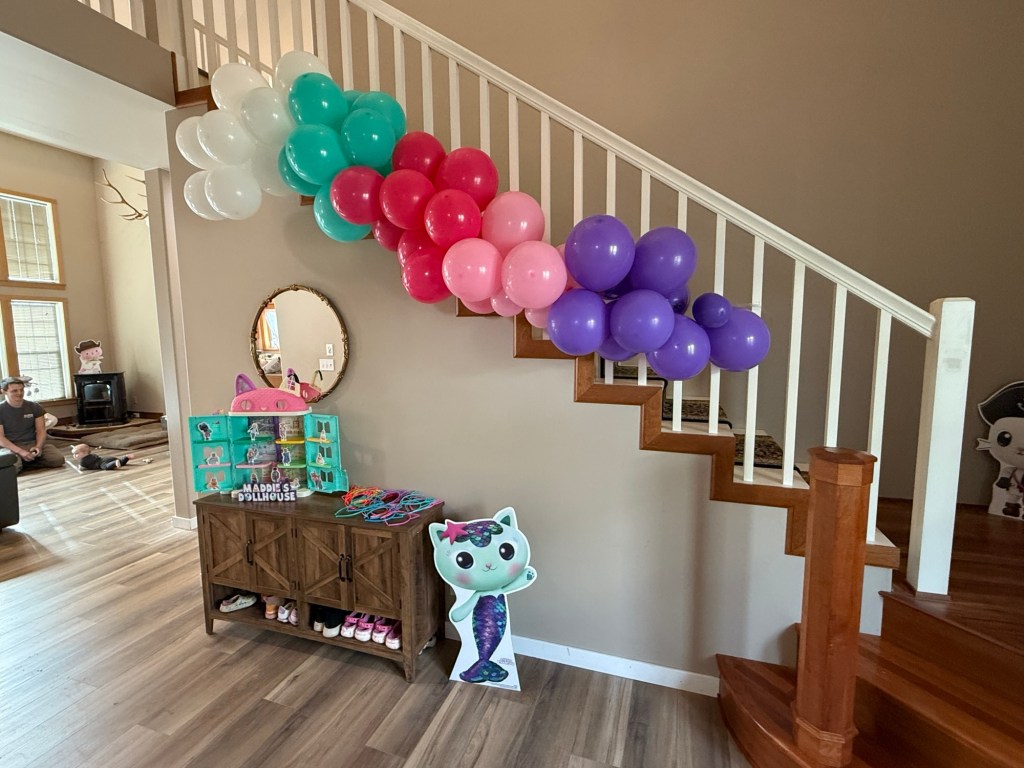
Balloon garlands are one of the easiest ways to make a big impact at a birthday party, and they instantly bring in all the fun, colorful vibes of a Gabby’s Dollhouse theme. I used a mix of teal, pink, purple, and white balloons to match the party colors and created garlands in two different areas to tie everything together. The best part is you don’t need any special skills to make one—just a few simple supplies and a little time.
🎈 How to Make a DIY Balloon Garland
Supplies:
- Balloon garland kit (in your color theme)
- Electric balloon pump
- Balloon strip (usually included in kits)
- Glue dots
- Thin ribbon or string
- Push pins or wall hooks
Step 1: Choose and Prep Your Balloon Kit
Start by ordering a balloon garland kit in your party colors. Most kits come with a mix of balloon sizes, a balloon strip, and sometimes ribbon or glue dots, which makes it really beginner-friendly.
Step 2: Inflate All Balloons
Use an electric balloon pump to inflate all of your balloons—this saves so much time. Focus on using the medium and large balloons first for the base of your garland, and set the smaller balloons aside for later.
Step 3: Build the Garland Using the Balloon Strip
Once your balloons are inflated, start attaching them to the balloon strip by pulling the tied ends through the holes.
You can alternate colors randomly, but I like to group about 5–7 balloons of the same color before switching to the next. This creates a more intentional, patterned look.
Step 4: Hang the Balloon Garland
Hanging the garland is usually the trickiest part. I use thin ribbon to help support the weight, then secure it to the wall using push pins.
You can either:
- tie the ribbon around the push pins, or
- pin the ribbon directly into the wall
Just be careful not to pull too tight, since the ribbon can tear if there’s too much tension.
Step 5: Fill in with Smaller Balloons
Once your garland is hung, go back and add the smaller balloons using glue dots. Place them anywhere the balloon strip is visible or where the garland looks a little sparse.
This step makes a huge difference and gives the garland that full, professional look.
✨ Tips for the Best Results
- Don’t skip the small balloons—they’re what make it look high-end
- Inflate a variety of sizes for a more organic look
- Build the garland on the floor first, then hang it
- Expect it to take about 1–2 hours if it’s your first time
Balloon garland kit (I used this one)
I reused the same color palette in multiple spots to make everything feel cohesive without spending more money.
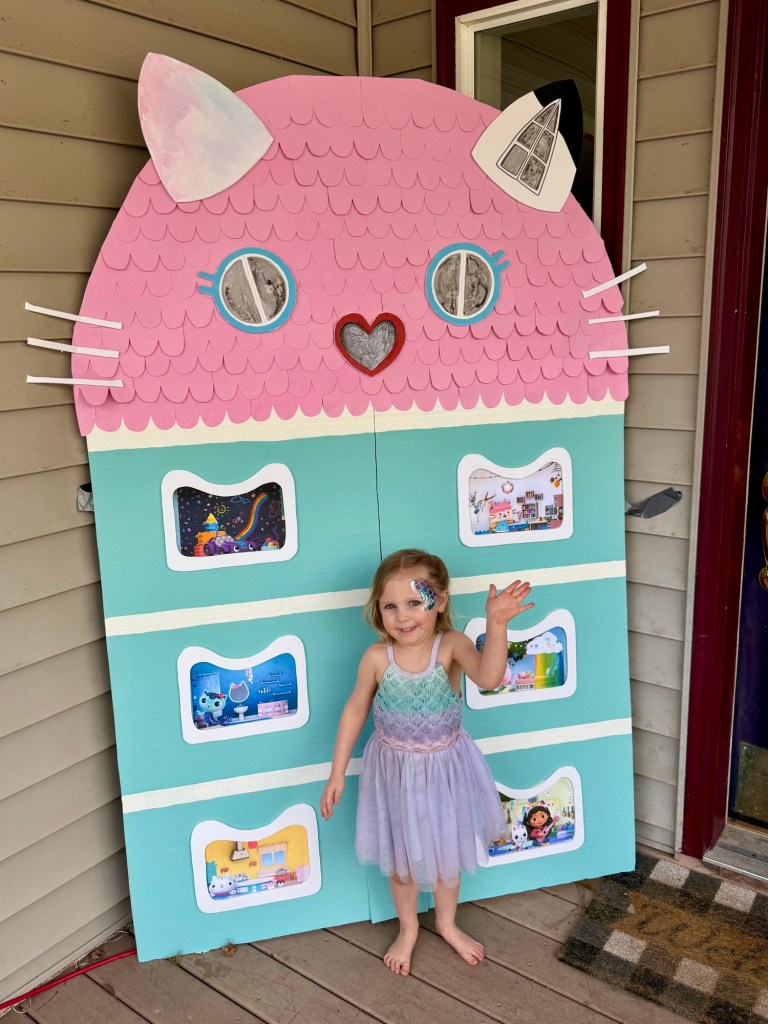
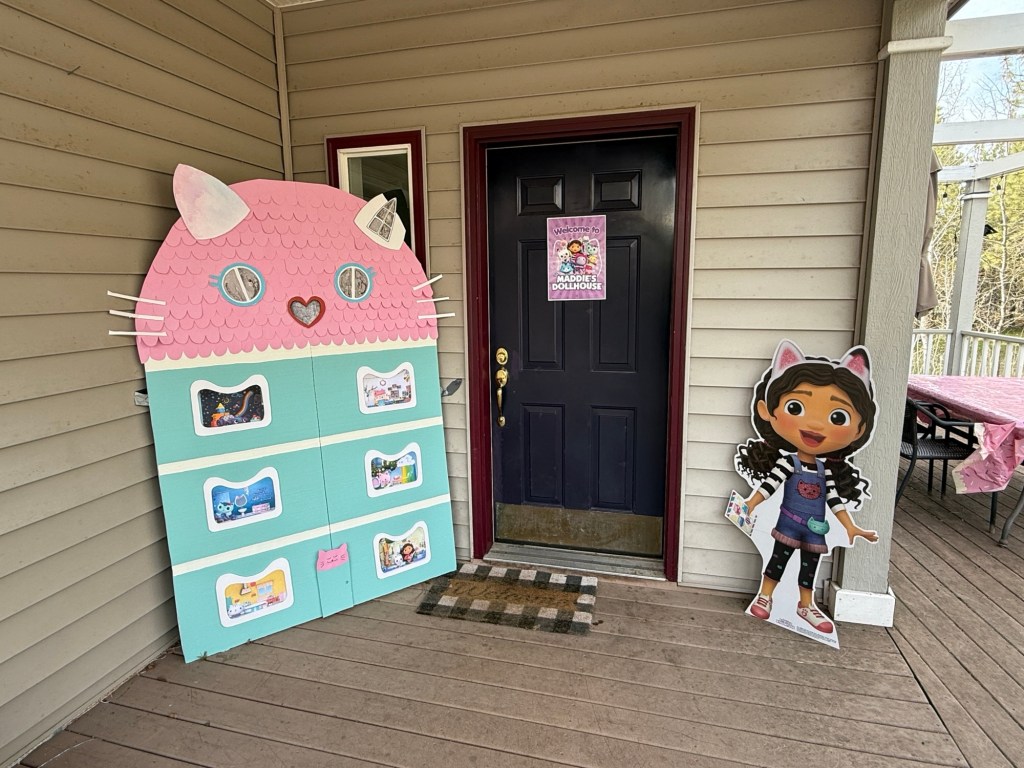
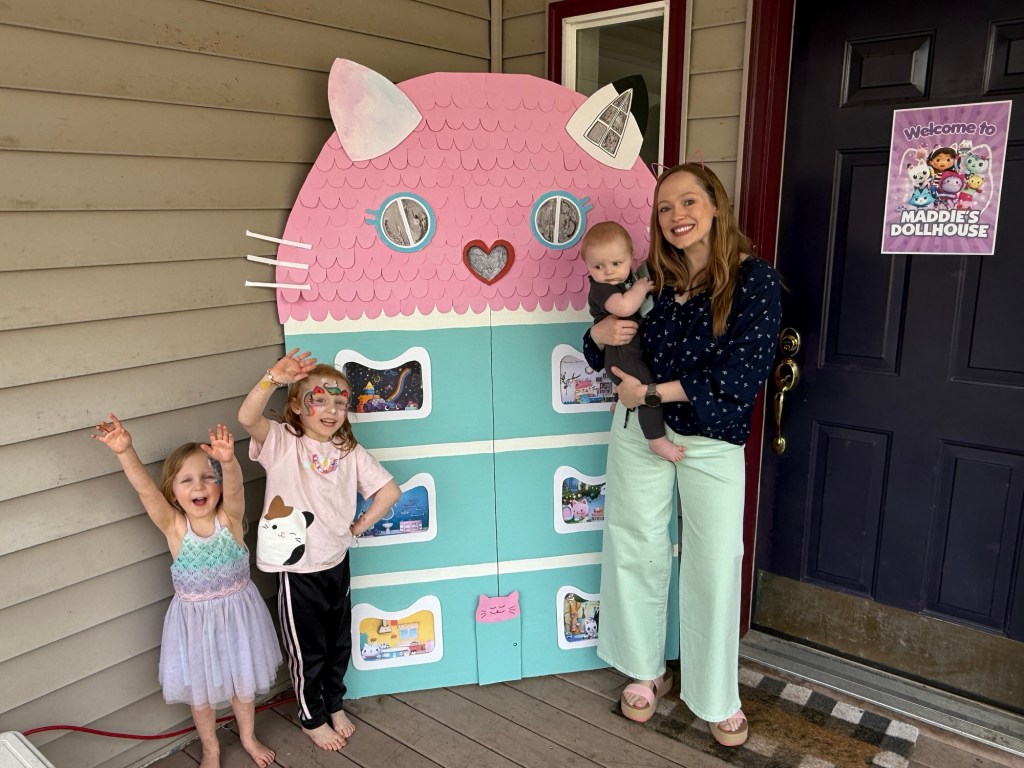
🏠 Giant Gabby’s Dollhouse Backdrop
This giant Gabby’s Dollhouse backdrop ended up being the main focal point of the entire party and the first thing guests saw when they arrived. It created the perfect photo spot and really gave that “wow” factor without being overly complicated to make. I kept it simple using basic materials, but the end result looked so fun and completely transformed the space.
Supplies:
- Large foam boards (from Home Depot or similar)
- Small foam board (for ears/details)
- Seafoam green paint (sample size works great)
- Small paint roller
- Pink construction paper or cardstock
- Cardstock (for windows/details)
- Hot glue gun + glue sticks
- Painter’s tape
- Box cutter
- White acrylic paint
- Smaller brush
🏠 How to Make a Giant Gabby’s Dollhouse Backdrop
Step 1: Cut the Dollhouse Shape
Start with a large foam board from Home Depot (mine was about 4 ft x 8 ft, which worked perfectly for a life-size backdrop).
To create the signature dollhouse shape, use a box cutter or sharp knife to round out the top into a dome shape. This doesn’t have to be perfect—the overall shape is what makes it recognizable.
Step 2: Paint the Base
Once your shape is cut, use a small roller to paint the entire board a seafoam green color.
Let it fully dry before moving on to the next step.
Step 3: Add Floor Divider Lines
To break up the dollhouse into sections, use painter’s tape to create two thick horizontal lines across the board.
These lines represent the different “floors” of the dollhouse and help give it that signature look.
Once your tape is in place, paint over the exposed areas to create clean white lines, then carefully remove the tape once dry.
Step 4: Add the Dollhouse Rooms
To create the inside “rooms” of the dollhouse, search online for Gabby’s Dollhouse rooms and choose a few images you like.
Print each image on 8×10 paper (this worked well for my backdrop size). If your backdrop is smaller, you could also use 5×7 prints.
Once printed, use a hot glue gun to attach each room onto your board, spacing them out between the floor lines.
Step 5: Create the Window Frames
To give each room that signature Gabby’s Dollhouse look, cut out window frames using a smaller foam board or poster board.
Trim them into soft, rounded shapes and layer them around each printed image to create a white border. Then use hot glue to secure them in place.
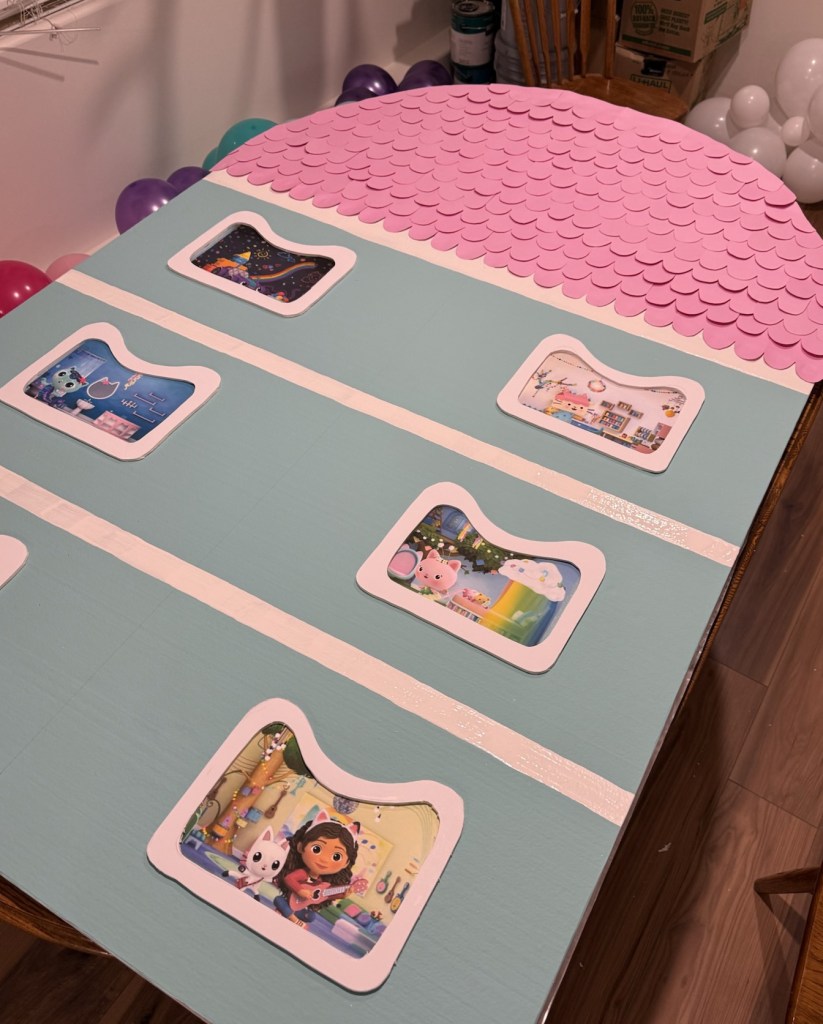
Don’t worry about making these perfectly even—the slightly imperfect, handmade look actually makes it feel more fun and true to the style of the show.
This step really brings the whole dollhouse to life and makes each room stand out.
Step 6: Add the Pink Shingle Roof
To create the roof, use pink construction paper and cut out small shingle shapes. I found it easiest to cut about 3 shingles at a time to speed things up.
Start by gluing your first row along the bottom edge of the roof, then work your way upward row by row.
As you go, slightly overlap each row and stagger the shingles so they aren’t perfectly lined up. This creates that layered, scalloped look that matches Gabby’s Dollhouse.
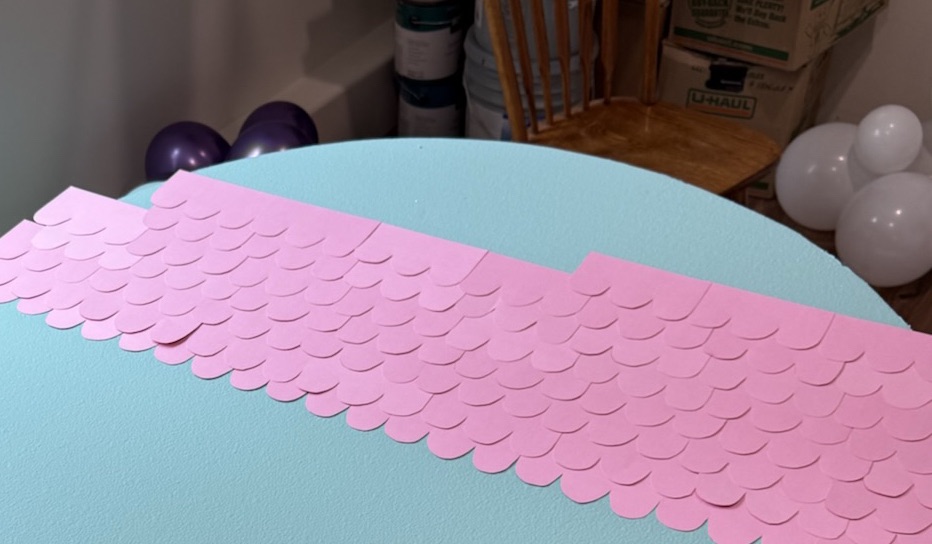
✨ Tips for the Best Look
- Always work from bottom to top so the shingles layer correctly
- Slightly overlap each row to avoid gaps
- Don’t worry about perfect spacing—the handmade look actually makes it cuter
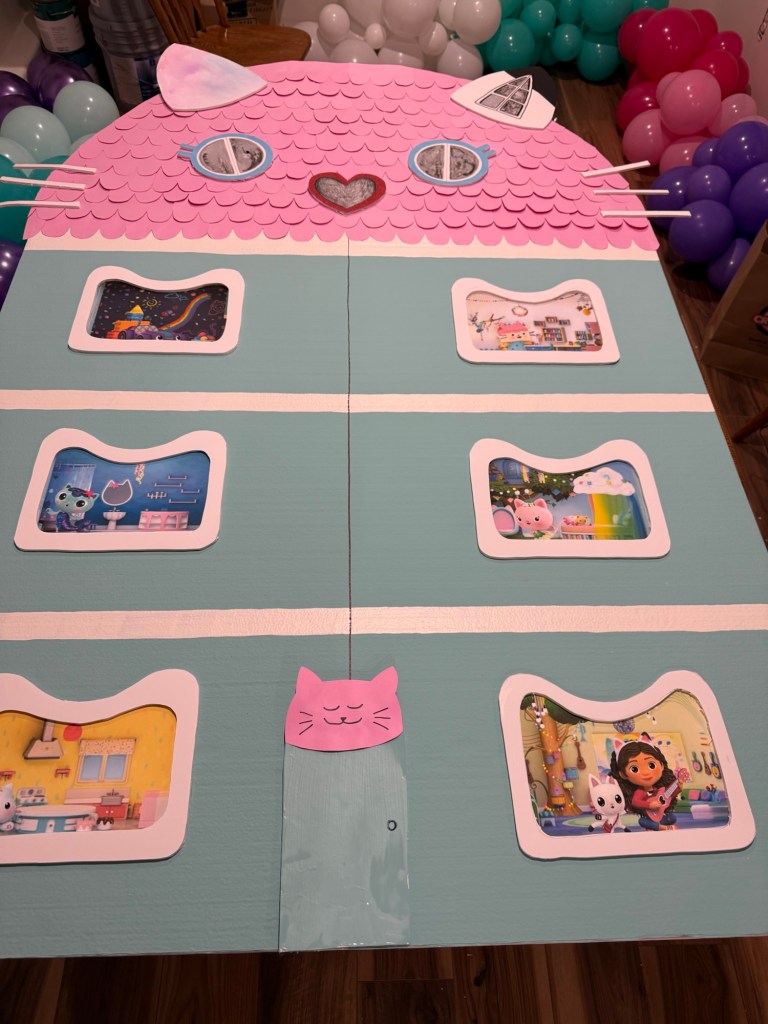
Step 7: Add the Ears and Whiskers
To finish off the dollhouse look, cut out ear shapes using a smaller foam board or poster board.
Once cut, hot glue them to the top of your backdrop. Then add whiskers using thin strips of foam board and glue those on as well.
For the inner ear details, you can either:
- paint them on, or
- use a Sharpie or marker
This step is simple, but it really brings the whole design to life.
Step 8: Add the Eyes, Nose & Final Details
To bring your Gabby’s Dollhouse to life, add the signature facial features!
Use construction paper (or cardstock for a sturdier look) to create:
- Two circular windows for the eyes
- A small heart shape for the nose
You can freehand draw these shapes like I did, or lightly sketch them first before cutting.
Attach everything using hot glue or strong tape:
- Place the eyes evenly near the top of the house
- Center the heart nose just below them
- Add simple whiskers using thin strips of paper or foam board for an extra fun touch
Don’t worry about making it perfect—slight imperfections actually give it that cute, handmade look!
Step 9: Set Up Your Backdrop
To set up the backdrop, you don’t need anything complicated. I simply leaned mine against an exterior wall and corner, which helped keep it stable and easy to adjust.
It works especially well in a corner, but you can also just lean it against a flat wall. The foam board is sturdy enough that it holds up really well on its own.
✨ Setup Tip
If you’re using it outside, placing it in a corner helps keep it secure and prevents it from shifting.
This ended up being the main photo spot and one of the first things guests saw when they walked in.
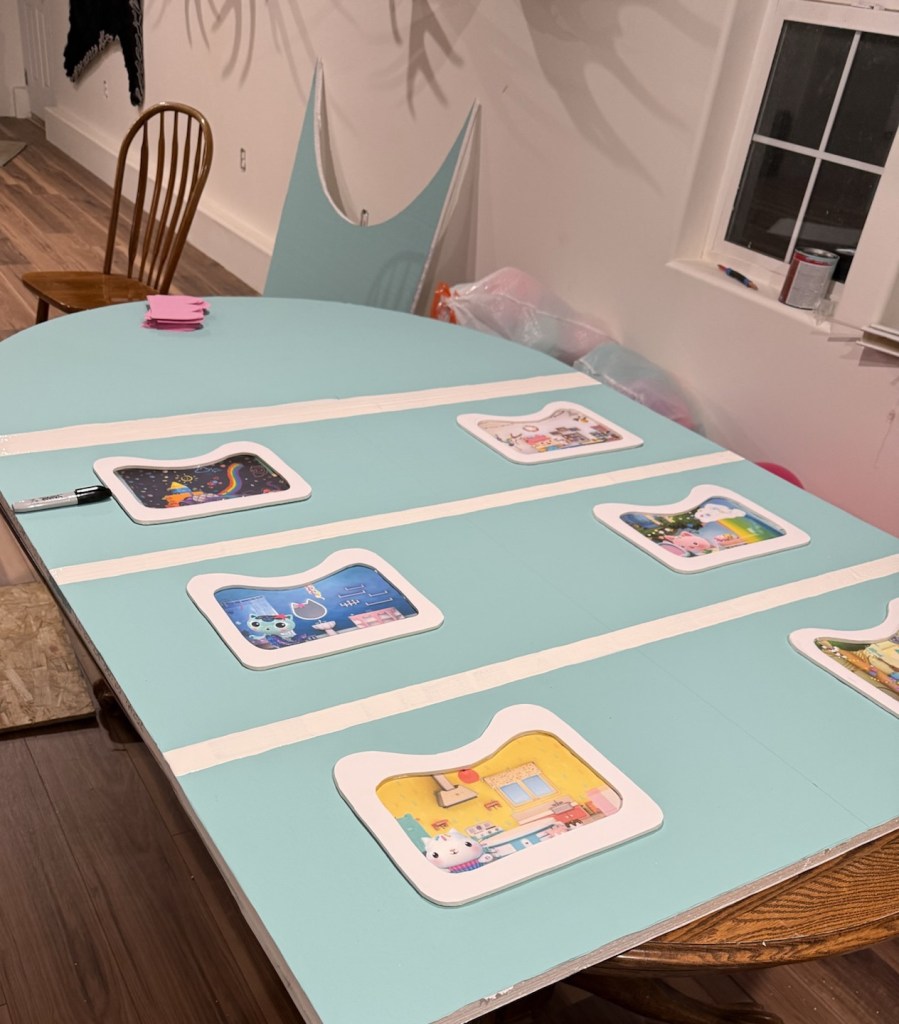
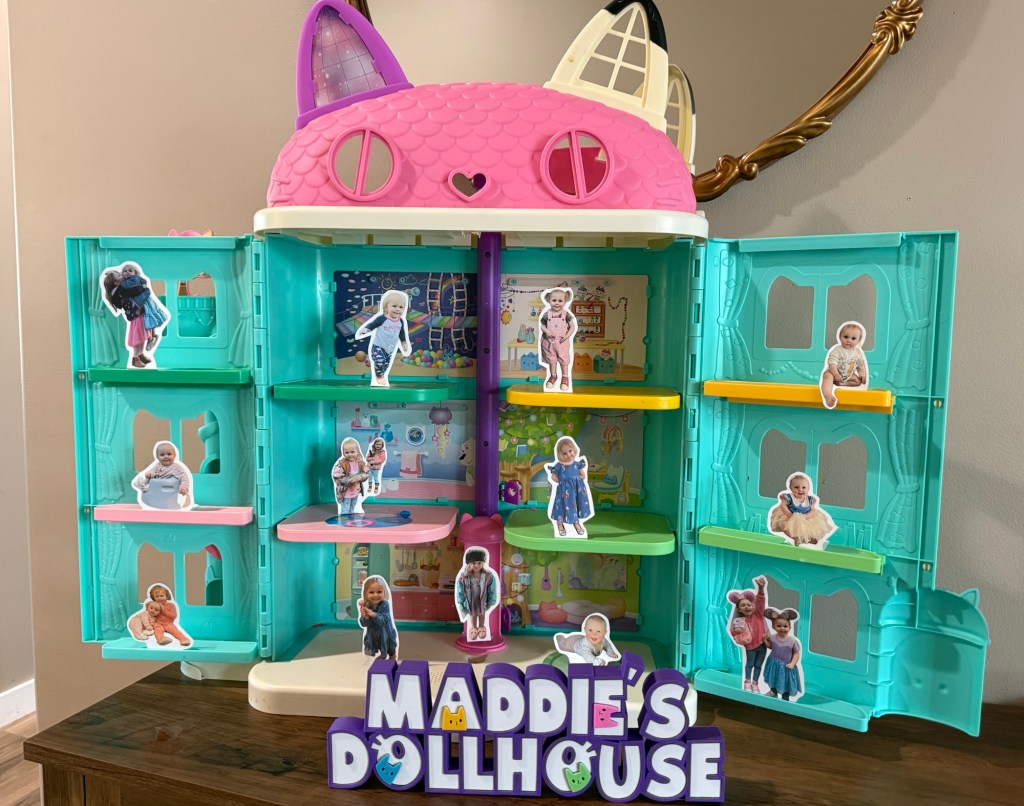
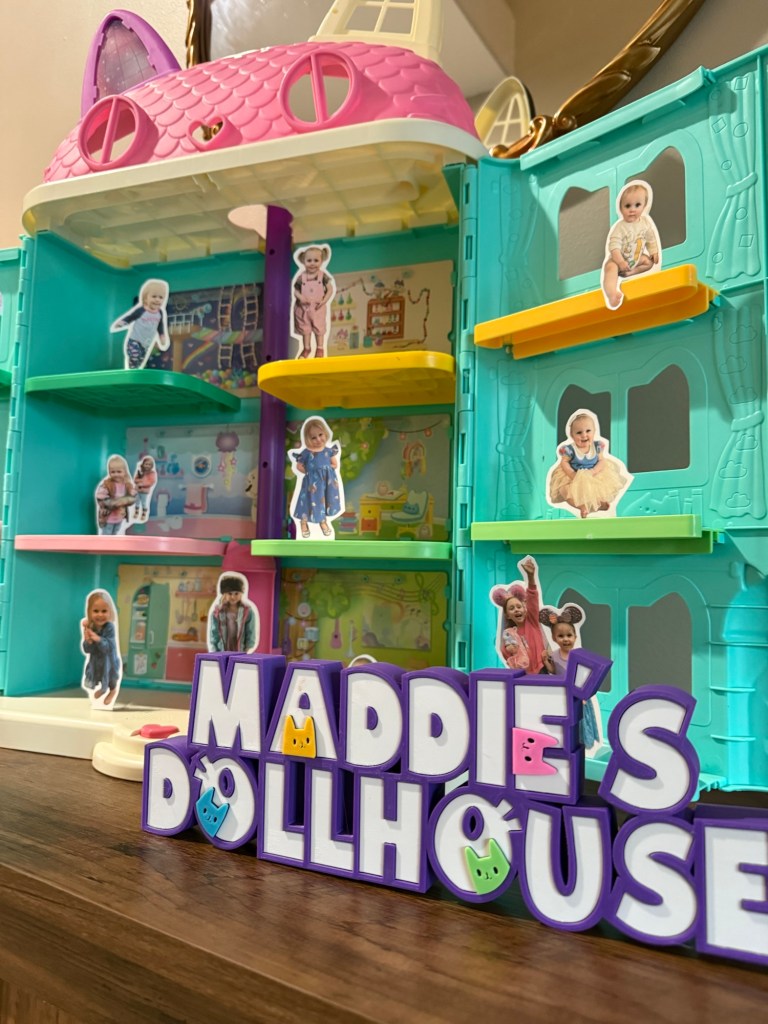
Maddie’s Dollhouse” Personalized Display
One of my favorite decorations from the party was this personalized “Maddie’s Dollhouse” setup right at the entrance. I used her actual dollhouse toy and turned it into a special display by adding little photos of her throughout each room. It was such a fun and meaningful touch, and it made the party feel extra personal without costing anything new.
🧸 How to Create a “Maddie’s Dollhouse” Personalized Display
Supplies:
- Gabby’s Dollhouse toy
- Cardstock paper
- Printer (phone or laptop to print photos)
- Tape or glue
Step 1: Choose Your Photos
Pick some of your favorite photos of your child. I used a mix of everyday moments and special memories to make it feel really personal.
Step 2: Create and Print Your Cutouts
Option 1 (Easy Method):
Print your photos in a small size (around 2–4 inches tall), then cut them out. You can leave a little white border around the edges to help them stand out.
Option 2 (My Method – Cleaner Look):
I created mine using my iPhone + Canva:
- Open your photo in the Photos app
- Press and hold on your child to create a sticker
- Copy and paste it into Canva
- Resize each image to about 2–4 inches tall
- Print on cardstock
This gives you that clean, outlined look that really makes the photos pop.
Step 3: Cut and Prep for Standing
Cut out each photo, leaving a small white border if you’d like.
Then leave about ½ inch of extra paper at the bottom and fold it backward—this creates a little “stand.”
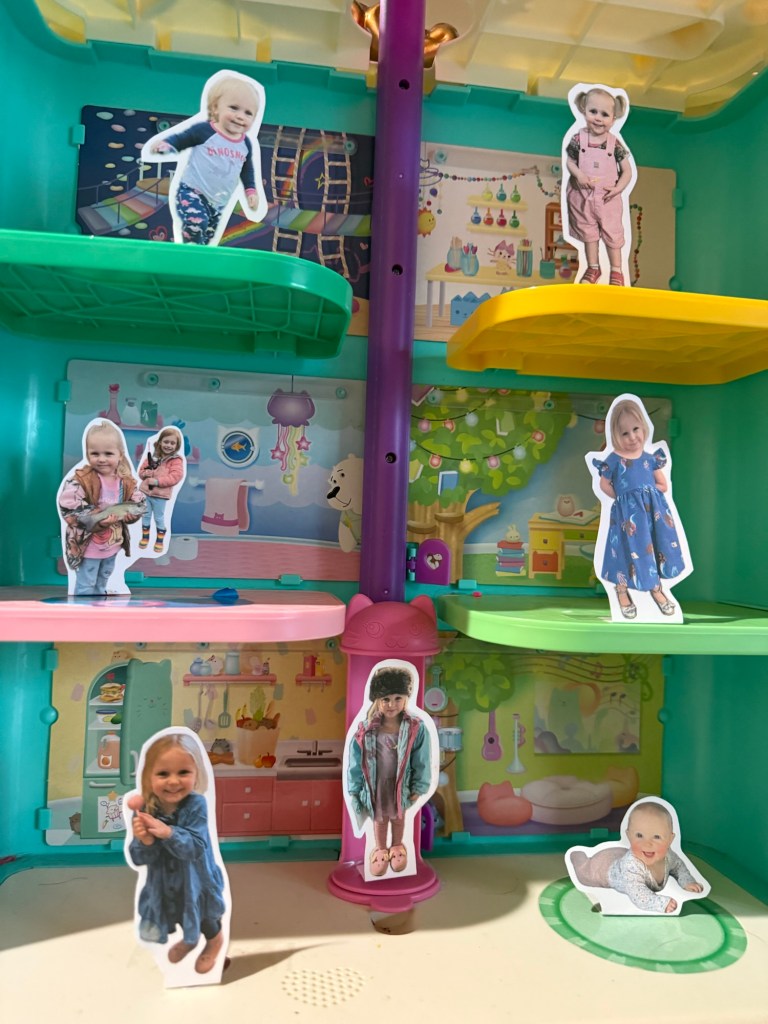
Step 4: Attach the Photos Inside the Dollhouse
Place each photo in different rooms and use a small piece of tape to secure the folded tab to the floor of the dollhouse.
This helps them stand up and stay in place.
Step 5: Style Your Display
Spread the photos throughout the dollhouse to make each room feel fun and full.
Set it near your party entrance or main table—it’s such a cute, personalized detail that guests will notice right away.
This was one of the most meaningful (and inexpensive) decorations because it made the party feel really personal.
DIY Dollhouse Mailbox (Inspired by the Meow Meow Mailbox)
I wanted to include a fun detail inspired by the show, so I created a “Meow Meow Mailbox” to go along with the Gabby’s Dollhouse theme. In the show, the characters receive special mail that leads to their next adventure, and I loved the idea of bringing that into the party in a simple way.
I used this as a decoration on our table setup, but it would also be such a fun interactive element for a party. You could add little notes for the kids, clues for the next activity, or even small surprises inside to make it feel like they’re part of their own Gabby’s Dollhouse adventure.
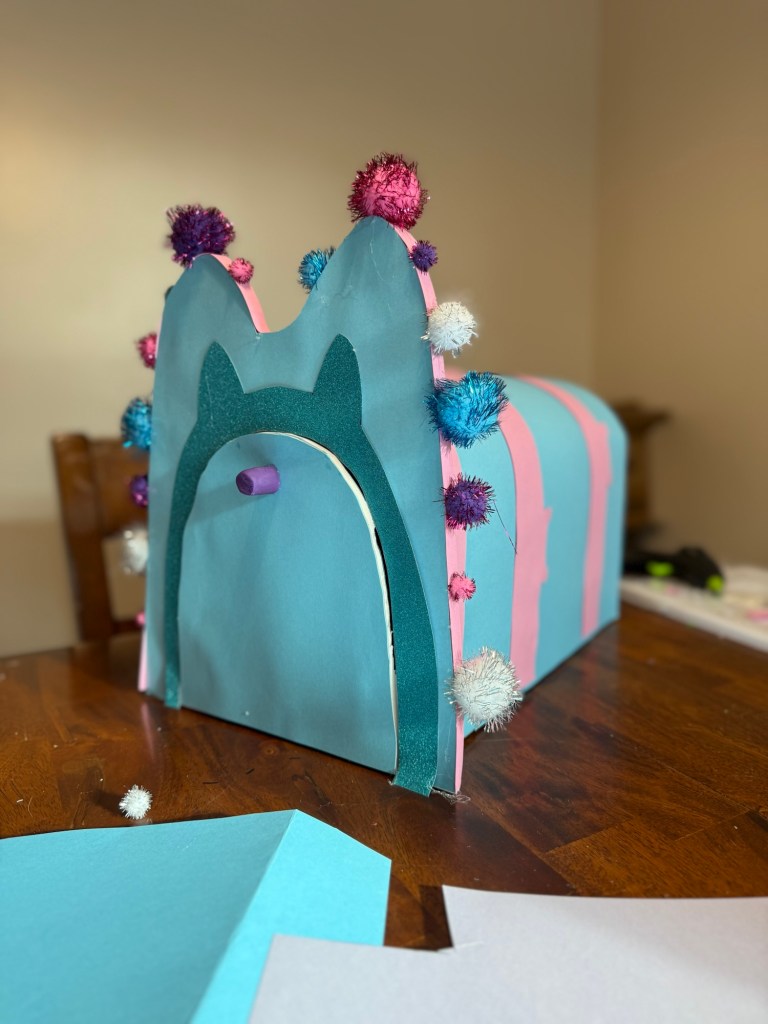
📬 How to Make a DIY “Meow Meow Mailbox”
Supplies:
- Empty box (I used a large Girl Scout cookies shipping box probably around 12 inches by 10 inches, but you could also use a large shoe box, etc.)
- 12 x 18 construction paper (teal/blue)
- Pink construction paper
- Hot glue gun + glue sticks
- Scissors
- Pom poms (optional but highly recommended!)
Step 1: Prep Your Box
Start with an empty box and remove the top flaps so you have an open base.
Step 2: Create the Curved Mailbox Shape
Take your 12 x 18 construction paper and gently arch it over the top of the box.
- Glue one side down
- Curve it over
- Glue the other side
This creates that classic rounded mailbox shape.
Step 3: Add the Pink Stripes
Cut long strips of pink construction paper and glue them across the mailbox.
Follow the curve slightly so it wraps nicely.
Step 4: Add Kitty Ear Details
Cut small triangle shapes and attach them along the stripes to mimic the Gabby “meow mailbox” look.
- Stagger them slightly
- Don’t worry about perfection—handmade looks better
Step 5: Create the Front Opening + Arch Detail
For the front:
- Cut an arched opening
- Add a darker teal border around it for that layered look
You can also add a small knob or handle in the center for extra detail.
Step 6: Add Pom Pom Accents (Optional but SO Cute)
Glue small pom poms along the edges and stripes.
This adds texture and makes it feel more playful and “finished.”
👉 This is one of those small details that makes a big difference.
Step 7: Display + Make It Interactive
Place your mailbox on a table or activity station.
You can leave it as decor or turn it into an activity by:
- adding notes
- giving clues
- or hiding little surprises inside
I had so much fun putting these DIY decorations together, and they made such a big impact without being complicated or expensive. If you’re planning a Gabby’s Dollhouse party, these are definitely worth trying!
If you’re short on time or just want to make things easier, you can shop all the Gabby’s Dollhouse decorations I used for this party right here. It’s everything in one place so you don’t have to hunt for it!
Want to see the full party setup? 👉Check out my full Gabby’s Dollhouse party post here.

Leave a comment